
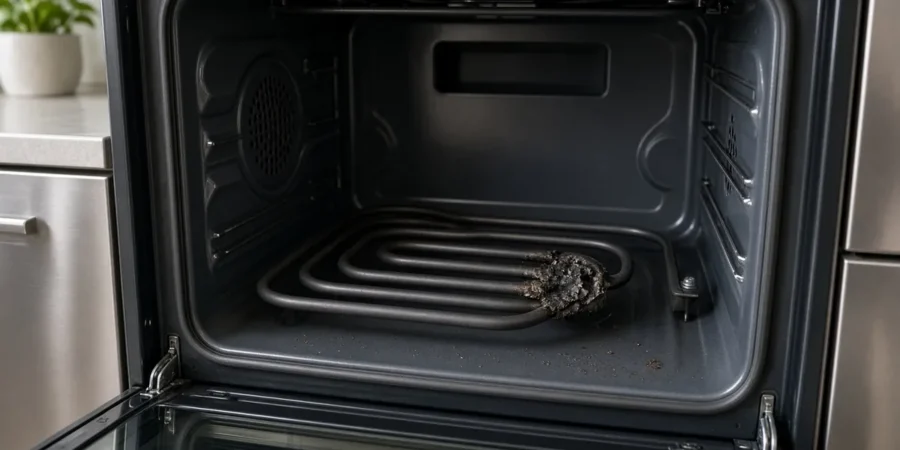
The heating elements in an electric oven are simple parts: metal-sheathed coils that glow red when current runs through them. Most electric ovens have two. The bake element sits on the oven floor (or hides under it on “hidden element” models), and the broil element runs across the ceiling. When one burns out, the oven may still turn on and the display may look normal, yet food comes out raw on the bottom or pale on top.
This guide is about the element itself: how to tell it has failed, how to test it, and how to replace it. If you have already ruled out the element and your oven still won’t heat, the cause is more likely a temperature sensor, the control board, or a tripped breaker, which we cover in a separate guide.
We only service electric appliances. If yours is a gas model, please contact a licensed gas fitter.
Signs Your Oven Element Has Failed
- No red glow. Set the oven to bake at 350°F. Within a few minutes the bottom element should glow orange-red. On broil, the top element should glow. A section that stays dark is a strong clue.
- Visible damage. Blisters, bubbles, cracks, a split in the sheath, or a spot that looks melted or burnt through.
- A flash or pop. Elements often fail with a bright spark and a bang, sometimes tripping the breaker. Turn the oven off and don’t use it until it’s been checked.
- Uneven cooking. Cakes burnt on top and raw underneath suggest the bake element is out and the broil element is doing all the work, or the reverse.
- Long preheat. The oven takes far longer than it used to, or never reaches the set temperature.
One common source of confusion: many ovens briefly use both elements during preheat, then cycle mostly the bottom element during bake. Watching for a moment isn’t enough; give it several minutes.
Bake vs. Broil Element: Quick Comparison
| Bake element | Broil element | |
|---|---|---|
| Location | Oven floor, or under a flat floor panel | Oven ceiling |
| Main job | Baking and roasting heat from below | Direct top heat for broiling and browning |
| Symptom when failed | Pale, undercooked bottoms; slow or no preheat | Broil does nothing; tops won’t brown |
| DIY access | Usually from inside the oven (exposed type) | Usually from inside, but some need panel removal |
How to Test an Oven Element (Power Off)
Safety first: unplug the range or switch off its breaker at the panel before touching any element. Electric ranges run on 240 volts, and an element that is “off” on the control can still be live. Let the oven cool completely.
- Remove the oven racks and, on hidden-element models, the floor panel.
- Find the mounting screws. Most elements are held to the back wall by two screws through a bracket.
- Pull the element forward gently a few centimetres so you can see the two terminals and wires behind it. Don’t let the wires slip back through the hole.
- Disconnect the wires. Take a photo first so you know which goes where.
- Test for continuity. Set a multimeter to resistance (ohms) and touch one probe to each terminal. A working element shows a reading; a reading of “OL” or infinite means the coil is open and the element is dead.
- Check for a short to ground. Touch one probe to a terminal and the other to the metal sheath. You should see no continuity. If you do, the element is shorted and must be replaced.
If you don’t own a multimeter, a visibly broken or blistered element is usually enough evidence on its own.
How to Replace an Exposed Oven Element
- Get the right part. Copy the model number from the rating plate (often on the frame behind the oven door or under the storage drawer). Elements are model-specific; one that “looks close” may have a different wattage or terminal layout.
- Confirm the power is off at the breaker.
- Remove the old element as described in the testing steps and disconnect the wires.
- Inspect the wires and terminals. If the wire ends are burnt, brittle or the insulation has melted, stop. Damaged wiring should be repaired by a technician, not just reconnected.
- Connect the new element by pushing the terminals firmly onto the new element’s spades, or securing the screw terminals.
- Push it back into place and reinstall the mounting screws.
- Restore power and test. Run the oven on bake at 350°F and confirm the element glows evenly within several minutes. A slight smell the first time is normal as factory coatings burn off.
Hidden bake elements
Many newer ovens have a smooth floor with the bake element underneath. On some models, the element can only be reached by pulling the range out and removing the back panel, or by removing the oven liner. That makes it a much bigger job, and it’s a common point where homeowners call us instead.
What Makes Elements Fail
- Age and heat cycling. Repeated expansion and contraction eventually cracks the coil.
- Spills and foil. Sugary spills that burn onto the element, or foil laid on the oven floor, can create hot spots. Avoid lining the oven floor with foil unless your manual says it’s allowed.
- Self-clean cycles. The very high heat of self-clean is hard on elements and other parts. Use self-clean sparingly and never leave the house while it runs.
When to Call a Pro
Replacing an exposed element is a reasonable DIY job. Call a technician if:
- The element is hidden under the oven floor or behind the liner.
- The terminals or wires behind the element are burnt or melted.
- The breaker trips again after replacing the element.
- A new element tests fine but still doesn’t heat, which points to the control board, relay, or temperature sensor.
Our oven and stove repair technicians carry common elements for brands including Whirlpool, Frigidaire, GE, KitchenAid, Samsung and LG.
Book a repair: call 647-642-1414 or book a visit online. We’re open 7 AM to 11 PM every day, statutory holidays included, at the same price, and we serve Toronto, North York, Scarborough and Etobicoke. The $70 service call is waived when you go ahead with the repair, and our repairs carry a 3 to 6 month warranty depending on the job. We’ve been fixing appliances since 2004 with licensed, insured and certified technicians. Read our 350+ Google reviews.
Frequently Asked Questions
How do I know if my oven element is bad?
Set the oven to bake and watch for the bottom element to glow red within a few minutes. No glow, visible blisters or cracks, or a dead reading on a multimeter (with power off) usually means the element has failed.
Can I still use my oven with a broken element?
It is not recommended. A damaged element can spark or trip the breaker, and cooking will be uneven. Switch the oven off at the breaker until the element is replaced.
Is it worth replacing an oven element?
Usually, yes. An element is a single part that is often simpler to replace than other oven components, and replacing it can restore normal baking without replacing the range.
Why did my new oven element stop working?
If a new element fails quickly or never heats, the cause is often upstream: burnt wiring, a failed relay on the control board, or a faulty temperature sensor. These are best diagnosed by a technician.